söndag 10 maj 2020

Birthday card for a 90 year old

Hello and welcome,
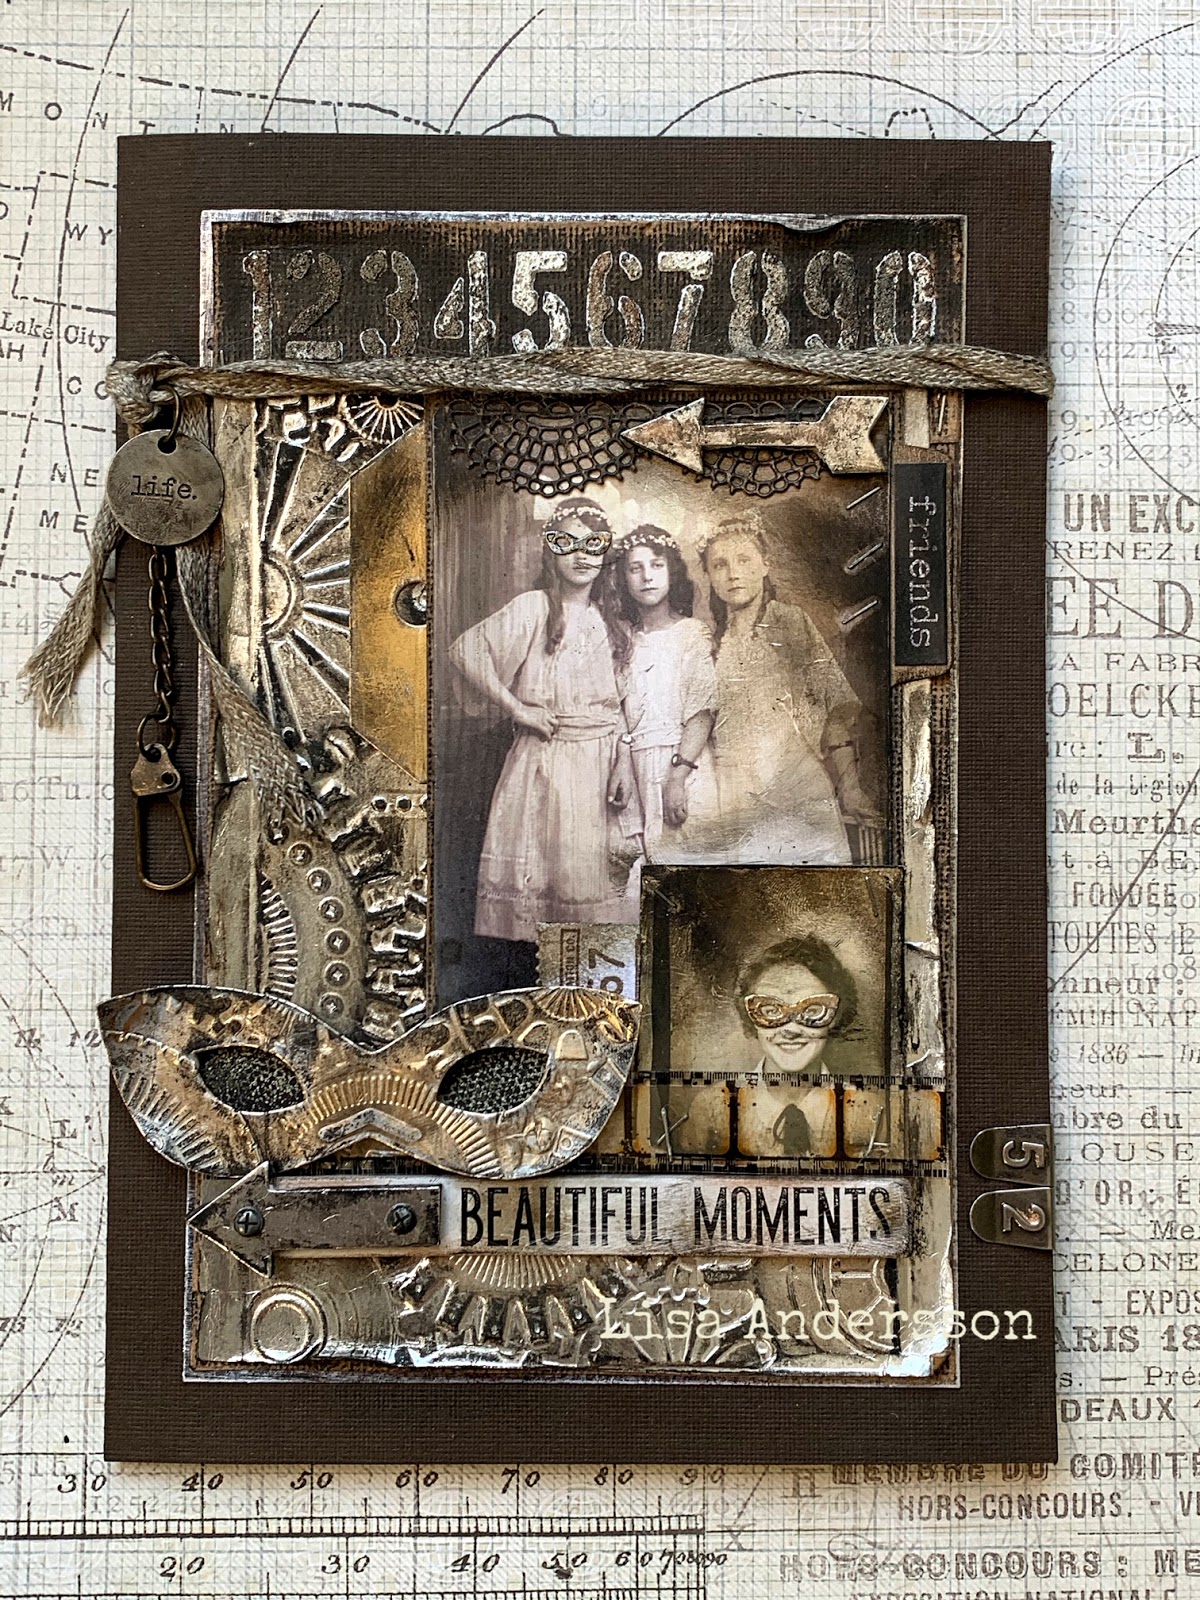
This is a Birthday card i've made for a 90 year old. Not often i get that chance, so cool. This is also my design team project for Ally's Angels and the new challenge starting today. The theme is Anything Goes.

To create my background i've used the distress micro glaze resist technique and some new stencils, distress oxide sprays and also the new glitch stamps, all by Tim Holtz. 


I cut a piece of watercolor paper in the size 14,5x18 cm and used distress micro glaze through the stencils digits and halftone. I then sprayed with cracked pistachio, evergreen bough and frayed burlap distress oxide sprays. I sprayed with water and heat dried. Wiped off with dry cloth. I then stamped using monarch orange archival ink and stamps from glitch 1, glitch 2 and mini glitch sets. I inked the edges slightly using ground espresso distress ink. 


I used the 3D embossing folder brickwork and watercolor paper to create a brick wall and painted it using brushed corduroy, ripe persimmon, rusty hinge and tea dye distress oxide sprays and rusty hinge, iced spruce, vintage photo and black sooth distress crayons. I used the dies gadget gears, steampunk parts, industrial and mini clock key and die cut the cogs and gears in chipboard or watercolor paper. All the orange gears are covered first in black gesso then painted with ripe persimmon distress paint, wiped some paint off with dry cloth and sprayed with tea dye distress oxide spray and water and let dry. Love the way they look, especially the ones with the more milky and distressed look. 


The big greenish circle in the middle is made earlier for another project but never used and I don't remember how I painted it but I do remember it was in a similar way as I have described above for the orange gears using black gesso and paint and oxide sprays but couldn't remember what combo of colours I used. I tried to create the same color for the cog in the middle but failed so it turned out a bit more blue then intended but decided to use it anyway. The yellow piece in the middle is an idea-ology vintage flair piece.

I stamped the hat and the collar from the distinguished stamp set using garden patina archival ink on watercolor paper. I covered the pieces in matte distress collage medium and then painted it using iced spruce, rusty hinge and gathered twigs distress crayons with my finger tips. 


Haven't used much decorations this time but managed to squeeze in some favorite idea-ology pieces like the hardware heads, large hinge clip and letterpress (to write 90). They are painted using either patina green antiquing cream from DecoArt and gathered twigs distress crayon or ripe persimmon distress paint and black sooth distress crayons. For the letterpress i used both antiquing cream and distress paint and to finish i used gathered twigs distress crayon. 

I matted my background onto dark orange kraft stock and behind it a panel of blue-green kraft stock. The base is black core'dination cardstock with orange core, folded to also create the inside of my card. All with sanded edges.

Thanks for stopping by today
Hugs, Lisa


PRODUCTS

TIM HOLTZ
-distress micro glaze
-stencils: digits, halftone
-stamp set: glitch 1, glitch 2, mini glitch, distinguished
-distress oxide sprays: cracked pistachio, evergreen bough, frayed burlap
-distress ink ground espresso
-distress crayons: rusty hinge, iced spruce, vintage photo, black sooth, gathered twigs
-3d embossing folder brickwork
-dies: gadget gears, steampunk parts, industrial, mini clock key
-distress paint: ripe persimmon
-idea-ology: large hinge, hardware heads, letterpress, vintage flair
-matte distress collage medium
-classic kraft-stock

OTHER
-archival ink monarch orange, garden patina from ranger ink
-black gesso, finnabair
-watercolor paper, canson 300gr
-patina green antiquing cream, decoart
-cardstock, black magic collection from core'dinations

fredag 24 april 2020

Handle with care

Hello and welcome,
Todays project is one that i've been thinking of for a while and been looking forward making. It's because of this very special stamp from the stamp set Cadaverous by Tim Holtz. I think this stamp is brilliantly designed and because he is so inspiring and so special he deserves a special project or at least an attempt. I colored him last year and have been looking at him now and then ever since...making plans for him...and I guess this project might not be everybodys cup of tea but i got this idea that i would "nail him" onto a brick wall...i know... ...crazy...but couldn't let go of this idea. So this was my starting point for this project (and just to be clear I'm a very kind and non violent person, lol). 


To create the brick wall panels i used watercolor paper, and my new 3D embossing plate brickwork, distress oxide sprays, crayons and translucent distress grit-paste. The colors i've used are hickory smoke oxide spray, black sooth and vintage photo distress crayons for the first one and for the second panel hickory smoke oxide spray and walnut stain, iced spruce, aged mahogany, peacock feathers and black sooth distress crayons.


The image is colored with my Prismacolor pencils and covered with matte collage medium. I wrapped metal wire around the idea-ology hitch fasteners and painted them and the idea-ology hardware heads using patina green antiquing cream from Deco Art and black sooth distress crayons. I stamped the 'handle with care' stamp from the set correspondence using jet black archival ink on watercolor paper, fussy cut, covered it in matte collage medium and used peacock and black sooth distress crayons to paint it.


The large hinge clip is first covered in matte collage medium and then opaque crackle paste, when completely dry i used patina green antiquing cream and black sooth distress crayons with some water.


For my background i used texture paste through the stencil eye shart on watercolor paper. I covered the whole paper with pumic stone distress paint and let dry before covering it with matte collage medium. When dry i applied black sooth distress crayon over the whole surface using my finger tip. I sanded the edges and over the stenciled areas and added some more black sooth distress crayons on the stenciled letters. Stamped using number stamps from the set field notes and jet black archival ink. 

I then made a similar panel but without the stencil to use behind my background. I made the small paper decorations with the numbers the same way and i think i might have set a personal record using idea-ology hardware heads in this project, lol. Love those little hardware heads. The bigger ones are idea-ology machinery heads (a new favorite) and they are all covered in matte collage medium and when dry painted with patina green antiquing creme and black sooth distress crayon. 


The cracked leather panel is painted with black sooth distress ink, and lots of layers with black sooth, iced spruce and peacock feather distress crayons. It's slightly sanded before adding the last layers of peacock feather and black sooth distress crayons. Behind this i have three panels from the idea-ology classic craft-stock; one grey, one black and one blue-green all with slightly sanded edges. The base is black metallic kraft-stock also with sanded edges. 

The bones are also made with stamps from the Cadaverous stamp set stamped in jet black archival ink and colored with my Prismacolor pencils. The mini hinge clip holding them is painted with patina green antiquing creme and black sooth distress crayon.


On the photo below you can see some other idea-ology embellishments that I've used. It's the optical lens and factory tag, definitely new favorites. I glued a hardware head onto the glass to match with the factory tag hole.


The idea-ology mini hardware pull (another favorite of mine) is first covered in matte collage medium then opaque crackle paste and when dry painted with patina green antiquing creme and black sooth distress crayon.


Hope you all are well and safe.

Lisa


Challenge


PRODUCTS USED

Tim Holtz
Stamp sets: CMS378 cadaverous, CMS225 correspondence, CMS396 field notes
Stencil: THS010 eye shart
3D embossing folder: brickwork
Translucent distress grit paste
Texture paste opaque crackle
Texture paste
Hickory smoke distress oxide spray
Black sooth distress ink
Distress crayons: black sooth, vintage photo, walnut stain, iced spruce, aged mahogany, peacock feathers
Pumice stone distress paint
Matte collage medium
Idea-ology: hitch fastener, hardware heads, machinery heads, factory tag, mini hardware pull, optical lens, large hinge clip, mini hinge clip
Classic kraft-stock: black, grey, blue/green
Metallic kraft-stock: black
Distress cracked leather cardstock
Jet black archival ink

Other
Prismacolor pencils
Metal wire from stash
Antiquing creme, Deco Art
Watercolor paper, Canson 300mg


söndag 19 april 2020

The Eye

Hello and welcome,
The Simon Says Stamp Monday Challenge theme this week is 'E' is for? so I thought I'd color up The Eye from the stamp set Cadaverous by Tim Holtz and make a card to play along.


The eye is stamped with jet black Archival Ink on watercolor paper and colored with my Prismacolor pencils. When I was done with my coloring I added some eye lashes using my black Prismacolor pencil and then covered the whole piece in matte distress collage medium and when dry used hickory smoke distress crayons to color my background using my finger as a tool.


I covered a black baseboard frame with clear gesso and when dry I used texture paste from Ranger Ink through the stencil Flourish by Tim Holtz and when completely dry I covered the whole frame with matte distress collage medium and used chipped sapphire and black sooth distress crayon to paint it. I used a damp cloth to rub off some paint. Wrapped metal wire around the side and attached the typed token metal decoration which is painted using matte distress collage medium and chipped sapphire and black sooth distress crayons. The hinge at the top of the frame is treated the same way but also used some opaque crackle paste for texture. The stars are die cut in chipboard using the star die by Tim Holtz and then painted using chipped sapphire distress paint and oxide spray then covered in clear distress glaze and painted with black sooth distress crayons. Behind the frame I have a panel of black metallic kraft-stock and a black panel of corrugated packing from a candy box. 

My background is made using distress mixed media heavystock sprayed with stormy sky oxide spray and heat dried. I stamped randomly around the edge with stamps from the set Faded Type using jet black Archival Ink and then covered the whole paper in a layer of matte distress collage medium. When dry I used chipped sapphire and black sooth distress crayons to paint using my fingers as tools. Behind my background I have a panel of black metallic kraft-stock with sanded edges. 


Made a panel using the new (for me) distressed cracked leather cardstock. I sprayed with stormy sky and faded jeans oxide sprays and some water and heat dried. Then used my chipped sapphire and black sooth distress crayons to paint it. Behind this I have a panel of black metallic kraft-stock and the blue base is actually the back side of a core´dination cardstock (black with blue core). 

I have made some decorations using pieces of silver metallic corrugated cardstock and as they were quite shiny I covered them with matte distress collage medium and then painted them with black sooth distress crayon as I wanted a matte finish and not so silvery.


The star borders are made with a 3D embossing/die by Tim Holtz and die cut in black metallic kraft-stock. Added some idea-ology hardware heads, a machinery head and a metal star. To paint them I used matte distress collage medium and chipped sapphire distress paint and black sooth distress crayon. The quote chip at the top is treated the same way and also sanded.


I used the thinlits alphanumeric tiny type upper die and black metallic kraft-stock to write the word 'THE' and the big deco die and chipboard to write 'EYE'. I used chipped sapphire distress paint and black sooth distress crayon to paint the big letters. 

Thanks for the visit
Stay safe
Lisa


Challenge


Products used:

Tim Holtz
Stamps: CMS378 Cadaverous, CMS397 Faded Type
Stencil: THS032 Flourish
Dies: Deco, Alphanumeric tiny type upper, Star border, Star
Idea-ology: Baseboard frame, Typed token, Star, Large hinge clip, Quote chip
Distress paint: chipped sapphire
Distress oxide spray: stormy sky, faded jeans
Distress crayons: chipped sapphire, black sooth, hickory smoke
Texture paste
Texture paste opaque crackle
Distress collage medium, matte
Distress crackle glaze rock candy
Distress mixed media heavystock
Black metallic Kraft-Stock
Distress cracked leather cardstock
Arhival Ink black sooth

Other
Clear Gesso, Finnabair
Silver metallic corrugated cardstock
Metal wire
Core´dination cardstock black with blue core

fredag 10 april 2020

The Alfa Romeo project for John

Hello and welcome to my blog,
Hope you all and your loved ones are well in these crazy times. Stay safe everyone.

A new challenge starts today at Ally's Angels and the theme is anything goes. For my design team project I have made a car themed tag using the mini etcetera tag by Tim Holtz.

I was asked by my friend John to do an "Alfa Romeo project" and I think a masculine car themed project is a lot of fun to make. The problem was the Alfa Romeo part - lol. I looked for an Alfa Romeo car stamp to color and found one but it didn't look att all like Johns car so thought I could always use a photo of his car. But then I finally decided to try to hand draw an Alfa Romeo by looking at photos John gave me. I also purchased an Alfa Romeo emblem to decorate my project with so there would be no doubt what car it would suppose to look like, just to be safe - lol. 


I kept my drawing very simple (as I have no drawing skills what so ever) and decided not to color like I usually do (using my Prismacolor pencils) but instead use distress collage medium matte and distress crayons with only my fingers as a tool. Just to distress the paper more than color the actual image. This gave it a different look. 

Most of my products used are by Tim Holtz. I started by covering an etcetera tag in the size small with transparent gesso. When completely dry I then used opaque texture paste through the stencil treads and let dry. I painted the tag on both sides using pumic stone distress paint and let dry completely. I then used black sooth distress crayons to paint parts of the tag and the stenciled areas. I mostly use my fingers when applying distress crayons. I stamped using one of the background stamps from the professor 2 stamp set and jet black archival ink.


I made the background panel using the 3D folder foundry (a favorite of mine) and silver metallic kraft stock. I sprayed some water on the paper and run it through my cuttlebug three times and I then cut the embossed paper in two pieces and also modified the edges a bit. I sanded it slightly and used mostly black sooth but also vintage photo distress crayons to give it color. 


The frame is made using the trinket frame die and die cut in chipboard. Covered it with gesso and when dry painted it using ground espresso distress paint. I also used some black sooth distress crayons before sanding it. I wrapped some metal wire from stash around the frame and used black sooth and vintage photo distress crayons to give it some color. The metal decorations are painted with distress crayons as well. Metal decorations are idea-ology by Tim Holtz, metal wire and a bulb from stash and an old spike from a car tire.


I die cut the voltage die in chipboard and painted the base in pumic stone distress paint and the bolts and frame in black sooth distress paint. The viewer is painted with ground espresso distress paint. All parts are sanded and finished with some black sooth distress crayons. I used label letters to write '1750 TI' the same as on the tailgate of John's car.


I die cut the number 159 (the model of the car) using the typo lower case die and chipboard. They are painted with ground espresso distress paint and inked with distress ink black sooth and then sanded.

I wrote 'turbo' by using idea-ology type ships and glued them onto the idea-ology metal gate.


As mentioned earlier I purchased an emblem for the steering wheel to put on top of my tag instead of the tag re-inforcer.

Thanks for the visit
Lisa


Tim Holtz products used
Stencil: THS045 Treads
Distress paints: pumic stone, black sooth, ground espresso
Distress crayons: black sooth, vintage photo
Distress ink: black sooth
Distress collage medium, matte
Etcetera tag, small
Stamp sets: CMS395 The professor 2, CMS225 Correspondence
Silver metallic kraft stock
3D embossing plate foundry
Dies: trinket frame, voltage, typo lower case die
idea-ology: machinery heads, factory tag, adornments foundry, label letters, measurements, metal gate, type chips, large hinge clips
Etcetera tag, small
Texture paste, opaque

Other products used

Chipboard
Alfa Romeo emblem
Transparent gesso, Finnabair
Watercolor cardstock, 180gr (for the drawing)


onsdag 8 april 2020

Using distress micro glaze as resist

Hello and welcome,
After watching Tim Holtz FB live demo's with great interest I decided to try the technique using distress micro glaze as resist. If you want to watch his demo's you can find them on his blog HERE.


So I took my distress micro glaze and used it with my distress tool through the stencils schoolhouse and industrial on distress mixed media heavystock. I then sprayed with weathered wood, tea dye and pumic stone distress oxide sprays, sprayed with water and used my heat tool to dry everything. The glaze resist the oxide spray, very cool! I added a touch of ripe persimmon distress oxide ink using the distress tool on a few areas and again sprayed with water and heat dried. I made som splotches using distress oxide spray ground espresso. I then used my distress tool and distress ink ground espresso around the edges but decided it looked too plain so added black sooth distress crayons around the edges as well. I almost always use my fingers to apply distress crayons. I decided to use my background to make a card and to use more orange, a colour that I hardly every use.


To make the stars I die cut the big star die in chipboard. Covered the stars completely in black gesso. I then painted them using ripe persimmon distress paint but wiped off some of the paint using a dry cloth before it dried and then sprayed them using tea dye distress oxide spray and quite a lot of water and put them aside to dry. Just love the way they turned out.


I die cut the big circle from the steampunk die and covered it with black gesso. I then painted it with ground espresso distress paint and wiped off with cloth before spraying them with tea dye distress oxide spray, lots of water and let dry. I then used tea dye and rusty hinge distress crayons. I did the same to the bolts. The small circle is painted with ripe persimmon distress paint and finished with a touch of black sooth distress crayons.


The metal stars are covered with distress collage medium matte and then ripe persimmon distress paint and then used some black sooth distress crayon. The black numbers in the upper right corner is a remnant rub.

The background is matted on to a black kraft panel with sanded edges. I then have another kraft panel in a greenish colour with sanded edges and then corrugated packing painted with ripe persimmon distress paint and the base is black kraft with sanded edges.

Thanks for the visit
Lisa


Tim Holtz products used
distress mixed media heavystock
distress oxide sprays: weathered wood, tea dye, pumic stone, ground espresso
distress paint: ground espresso, ripe persimmon
distress oxide ink: ripe persimmon
distress ink ground espresso
distress crayons: black sooth, tea dye, rusty hinge
distress micro glaze
stencils: schoolhouse, industrial
dies: steampunk parts, stars
idea-ology: stars
black kraft, green kraft
distress collage medium matte
remnant rubs Halloween

Other
corrugated packing
chipboard
black gesso


söndag 16 februari 2020

Lilleman - the crazy dog

Hello and welcome to my blog,
I was asked to make a project with a dog on for my best friends hubby, Peter. So I have colored up one of the crazy dogs by Tim Holtz. I chose the one that was most alike Peter's dog Lilleman who is a Cane Corso Mastiff. He is colored using Prismacolor pencils as well as the bow tie and the hat from the stamp set crazy things also by Tim Holtz (TH). 


I chose to make a tag instead of a card this time and I have used the mini etcetera tag from Stampers Anonymous. I started by covering the tag completely in white gesso and let dry. Then I used opaque texture paste thru the stencil decayed in some areas and covered the rest of the front side of the tag with white crackle paint. When completely dry I painted the whole tag using distress paint weathered wood followed by distress ink walnut stain in some areas followed by distress paint broken china and black sooth and distress crayons walnut stain and black sooth. I also used a little bit of water. I then used some baby wipes to remove paint in some areas. When I was happy with my background I stamped with one of the background stamps from the new Professor 2 set by TH using archival ink jet black.


I die cut the planks using woodgrain paper from Ranger Ink and the die planks by TH and then used distress oxide sprays vintage photo and pumic stone and distress crayons broken china, walnut stain and black sooth to paint them. I then die cut more planks and glued them together as I wanted the planks thicker. On one of the planks I have used the TH die claw marks. The nuts are die cut in chipboard (I used the voltage die by TH) and painted using distress paint broken china. I then sanded the edges and used the distress tool and distress ink walnut stain to ink the edges. The idea-ology mini hardware pull is painted with distress paint broken china and distress crayons black sooth and walnut stain. 


The bones at the top of my tag are die cut in chipboard using the skull die by TH. They are painted using distress paint broken china and distress ink walnut stain and sanded.


For the sentiment I used woodgrain paper and distress oxide spray pumic stone and hickory smoke followed by distress crayons walnut stain and black sooth and when completely dry I embossed the 'beware' stamp from the stamp set mr bones by TH in a dark red color from Sparkle N Sprinkle. On each side of the sentiment I have an idea-ology hardware head painted with distress crayons walnut stain. 


I added an idea-ology hinge clip on the side and used the chain from a swivel clasp, a jump ring, a mini book ring and a hitch fastener. All these parts are painted with distress crayons black sooth and the hinge clip with distress paint broken china and walnut stain as well.

Thank you for stopping by
Lisa


CHALLENGE


PRODUCTS USED
Tim Holtz
- mini etcetera tag
- dies: planks, skull (the bones), voltage (the bolts), claw marks
- stamp sets: crazy things (bow tie and hat), crazy dogs, bones (the sentiment), the professor 2 (background stamps)
- idea-ology: mini hardware pull, hardware heads, hinge clip, swivel clasp (chain), book ring, jump ring, hitch fastener 
- stencil: THS129 decayed
- distress ink walnut stain
- distress crayons black sooth, walnut stain
- distress paint broken china, black sooth, walnut stain
- distress oxide spray pumic stone, hickory smoke, walnut stain, broken china, vintage photo
- woodgrain paper
- opaque texture paste
- archival ink jet black
- distress tool

Other
- white gesso, Finnabair
- prismacolor pencils
- crackle paint, DecoArt
- string from stash
- baby wipes
- chipboard
- dark red embossing powder from Sparkle N Sprinkle


måndag 10 februari 2020

Beautiful moments

Happy Monday,
Welcome to a new challenge at Ally's Angels and once again the theme is anything goes
I have made this card for a friend. 


I wanted to use this photo from Tim Holtz idea-ology found relatives and also one from the photo booth package. I have had them for a while and thought it was time using them. The photo is followed by a panel of sanded black kraft and I have used the tiny attacher to staple them together, just because I love the look of staples. The tiny masquerade masks are die cut in champaigne metallic kraft and painted with black sooth distress crayonThe lace is die cut using the chrochet die and black kraft and then sanded. I also die cut arrows from the artful arrow die in silver metallic kraft and as I wanted the arrows a bit thicker I die cut them in chipboard as well and glued them together before sanding them and painting them with black sooth, gathered twigs and antiqued bronze distress crayons.


I die cut the file tab in kraft and glued a sticker from idea-ology big chat to it and used black sooth distress crayon and blended out with my fingertip. My background is made of silver metallic kraft. I sprayed a little bit of water on the kraft before running it through my cuttlebug three times using the 3D folder mechanics, so the paper wouldn't break. I then sanded it and ran it through my cuttlebug once again and then used black soot, gathered twigs and antiqued bronze distress crayons to paint it.


I die cut the big tag in champaigne metallic kraft. The tag is sanded and painted using black sooth and gathered twigs distress crayon. I made a hole on the upper left side of the brown base so I could get the linen ribbon through and wrap it around the front of my card. Made a knot and used a jump ring so I could hang the swivel clasp and the typed token from the ribbon.


To create the row of numbers on top of my card I die cut the number die from the Tim Holtz mixed media 6 die set in 300g watercolor paper to create a stencil. I then used grit paste through the stencil and let dry completely before using black sooth, gathered twigs and antiqued bronze distress crayons to paint them. I sprayed with some water and used my fingertip to blend out.


The filmstrip is stapled in place using the tiny attacher and I die cut the big masquerade mask in champaigne metallic kraft and run it through my cuttlebug together with the 3D impresslits mechanics before sanding and painting it with black sooth and gathered twigs distress crayons. Behind the mask I have a piece of embossed black cardstock. To create this I have used frayed burlap distress embossing powder and the lace background stamp from Tim Holtz. I then cut small pieces to put behind the mask and used 3D tape for depth. I sanded the edges of the quote chip and used black sooth and gathered twigs distress crayons and then glued the arrow with two hardware heads onto the quote chip. Down at the right hand side I added two number clips, you can see them on the first photo above.

Behind my background I have a panel of black kraft with sanded edges followed by sanded silver metallic kraft followed by my base which is a brown cardstock folded to create the inside of my card.

Thanks for stopping by
Lisa


PRODUCTS USED

Tim Holtz
- dies: tag, masquerade, artful arrow, mixed media 6, crochet, file tab 
- 3D impresslits mechanics
- stamp set CMS348 ornate and lace
- idea-ology: found relatives, photo booth, typed token, hardware heads, linen ribbon, jump ring, swivel clasp, quote chip, filmstrip, clips, big chat
- metallic and blackout kraft
- distress crayons: black sooth, gathered twigs, antiqued bronze
- distress embossing powder: frayed burlap
- tiny attacher
- grit paste

Other
- brown and black cardstock from stash
- kraft
- Canson watercolor paper, 300g